[CLICK-> 1969 Chevy Camaro project car full story [PART-3] is here <-CLICK]
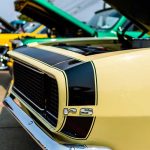
Exterior – Paint:
I chose Syndicate Automotive Concepts in San Diego to do the paint. I chose them for the following reasons:
1. Their time estimate (3 – 4 weeks) and price quote ($4000 – $6000) were very competitive and inline with my expectations.
2. They were located only 15 minutes from my home so I could stop by often.
3. They have turned out some great work that I’ve seen with my own eyes and others have attested to.
4. They have a nice shop and they keep it clean and professional.
5. While other shops are struggling for business lately, they’ve kept a steady schedule of work which is a good sign.
6. They listened to me and what I wanted instead of trying to tell me what they think I should do with my car (they understood this car was going to be a driver and provided me options instead of a single, over-the-top solution).
7. They’re a group of young guys like myself and just a pleasure to chat with. The type of guys I want to do business with.
I delivered the car to Syndicate in a super-clean and prepped condition (which they were very happy about), having done most of the body and metal work myself. The car was delivered in a completely stripped down, unassembled state. The paint and body work that Syndicate and I agreed upon was:
1. Block sand the car, repair any minor or low spots as best as possible.
2. Apply sealer, 4 coats of color and 4 coats of clear (2 stage paint).
3. Wetsand the clear and buff (cut and buff).
4. Paint the car unassembled and return the car to me unassembled so that I may reassemble it myself.
Syndicate delivered my car back to me in a little over 5 weeks which is slightly over their estimate but still very timely when compared to other nightmares I’ve heard about. Andy, the guy who managed the work on my car and painted the car, was a helluva a nice guy to work with. Overall, the paint came out great. There were a few spots they missed during their block sanding, but there are a few spots where they did more than I asked for, so overall things averaged out in terms of the minor bodywork they performed. They did a great job of masking off the car, undercarriage, and engine and there was absolutely no overspray anywhere which I was very happy about. The paint is really beautiful and it’s the exact blue that I was looking for. The gloss is exceptional. Overall, it’s not perfect but I didn’t ask for perfect since it’s going to be driven very often. In summary, it’s inline with the expectations we both agreed upon and I’m quite satisfied with the work they did. I would recommend them to others.
Total for Paint, minor bodywork, cut and buff, and delivery to/from Syndicate: $5949
Media Blasting and Powder Coating
I used Orange County Sand Blasting to handle the media blasting and powder coating of some of my parts. Their prices are dirt cheap and they always got my parts back on time. I wish I had used them more often instead of doing so much of the stripping myself. Here’s what I had media blasted at their shop:
1. Lower control arms
2. Door hinges
3. Radiator Support
4. Inner fenders
5. Cowl vent
6. Lower valance
7. Fender extensions
8. Front and rear bumper brackets
I also had them powder coat my lower control arms.
Total for media blasting and power coating: $255
Body and Metal Work
To save myself a bunch of money and to minimize the time the car spent in someone else’s shop, I performed the following body and metal work on the car. I used my MIG welder to replace metal where needed in order to preserve the original parts. I used Evercoat products for my filling materials, Icing for my topcoat filling, and Evercoat/Eastwood products for my various primers and coatings (self-etching, high-build, rust encapsulator, extreme chassis black, etc).
1. Driver-side fender – Replaced the entire bottom-right corner section using a patch panel I purchased from eBay and my MIG welder. The section was the bottom right side where it meets the lower part of the door. A common area for rust. I also had to replace the metal layer behind it that provides support, which I created from scrap sheetmetal. Filled (with the MIG) about 6 holes where the large ‘Camaro SS‘ logo was mounted. Fender was then filled and block sanded to level in repair areas. Minor areas around wheel opening were leveled and several holes for chrome trim were filled with weld also. Inside of fender was stripped, rust-proofed and coated with satin black.
2. Passenger-side fender – Replaced a 4″ x 4″ triangular section of metal near the bottom left side where it meets the lower part of the door (same problem with other fender, although not as bad). Used a piece of sheet metal and the MIG. Filled the radio antenna hole with sheet metal and the MIG. Filled (with the MIG) about 6 holes where the large ‘Camaro SS’ logo was mounted. Fender was then filled and block sanded to level in repair areas. Minor areas around wheel opening were leveled and several holes for chrome trim were filled with weld also. Inside of fender was stripped, rust-proofed and coated with satin black.
3. Hood – The reproduction hood bowed a little in the middle so it was about 3/4″ inch higher in the middle than the header panel. I used some 2 x 4’s, padding, and concrete blocks to massage the hood into shape and remove the bow in the middle. Fortunately, I did not have to break the factory welds to get it to bend into shape to match the line on the header panel.
4. Rear Tail Panel – This panel required the most work. About 40 hours. It’s a panel with a lot of different curves and levels so it just takes a while to work with it. I probably should have just replaced the whole thing, but oh well, hindsight is 20-20. The passenger-side opening for the tail lamp was in bad shape (rusted out) so I had to weld in a new upper lip for the opening. I custom fit each tail lamp opening in the tail panel to match perfectly the shape of the new repo tail lamp lenses. That was a very time consuming effort. There was also some bad body work around the gas tank tube opening and in other places that needed replacing, and the bottom edge of the tail panel was a mess and very uneven. I did my best with a hammer and dolly and filler to get the bottom edge respectable.
5. Window frames, door jambs, and the trunk opening – Stripped to bare metal to remove rust, then rust-proofed and primed. Trunk opening needed filler in several places to clean up and one of the door jambs needed a patch panel welded in where the previous owner hacked a hole in it to run a radio antenna cable. These areas were actually quite a bit of work due to their shape.
6. Rear Quarter Panels – Only the rear bottom portion (behind the rear wheel) needed to be straightened a bit with a hammer and dolly and then filled and block sanded. The passenger side wheel opening required some smoothing. Insides of quarters were stripped, rust-proofed and coated with satin black.
7. Doors – Doors only needed minor rust removal and filling in a few spots, and then the inside of each door was stripped and coated with Eastwood rust proofing.
8. Roof – Minor rust spot on driver’s side near the front windshield needed removal, rust-proofing, metal filler, and then some skim coats and block sanding.
9. Front Valance, Fender Extensions, and Cowl Vent – filled some minor dings and block sanded. Inside of each of these pieces was stripped, rust-proofed and coated with satin black.
10. Undercarriage, Frame, and Engine Bay: Totally stripped to bare metal and recoated with Eastwood chassis products. Oh my God that was an ugly, time consuming job. I should have paid someone to do that.
Parts
Fortunately, the only piece of sheet metal I had to buy was the front header panel. I went with a NOS part from eBay after buying a repo that didn’t fit very well. Here’s a breakdown of all parts purchased for the exterior:
GM NOS 69 Header Panel, Part # 3937529 — $434
Billet Aluminum Hood Hinges — $625
DSE Selecta-Speed Wiper Motor — $320
Billet Headlight Knob — $18
RS Conversion Kit (Returned $530 in parts in favor of Electric Kit) — $1067 – $530
RS Electric Headlamp Conversion kit – 15% discount — $383
RS Lower valance-to-inner fender braces — $37
Front Header Panel ‘Camaro’ emblem — $15
Billet Aluminum Front and Rear SS badges — $100
Rear Quarter Panel Louver Moldings (Gills) – US repro — $80
Billet Aluminum plate for custom ‘Z’ letters on fender — $6
Chrome plating for 4 ‘Z’ letters on fender — $50
454 emblems — $43
Front Bumper — $120
Front Bumper Brackets, Original GM — $30
Front Lower Spoiler & install kit — $42
Front License Plate Bracket, original GM — $21
Bumper Bolts — $5
Chrome Bumper Bolt Kit — $20
Rear Bumper Bracket Kit — $25
Front Bumper Corner Mounts — $12
Rear Spoiler & mounting kit — $99
Door Handle Kit — $52
Door lock striker — $20
Door Jamb Grille — $32
Door Latch mechanism bolts — $8
Door lock mechanism spring (missing from original lock) — $11
Door lock set(for both doors) — $14
Sideview mirrors for doors — $60
Door handle mechanism (sold only in pairs) — $30
LH Side Door Glass — $104
RH Side Door Glass — $104
LH Side Quarter Glass — $72
RH Side Quarter Glass — $72
Rear Glass — $115
Rear Glass install by ‘Professional’ — $100
Door Glass Sash Channel Mount Stud Assembly — $43
Quarter Windows Roller Assembly bolt — $27
Stainless Studs for Front/Rear window molding clips — $7
Professional Polishing of Rear Window Trim — $160
Windshield Wipers (Stainless steel) — $56
Windshield Wiper Removal Tool — $5
Tail Lamp Gaskets — $11
Front Parking Lamp Lens — $17
Front Parking Lamp Chrome Ring — $9
Side Marker Lamp Bezels — $17
Stainless Steel Gas Tank — $164
Gas Tank Anti-Squeak Set — $16
Fuel Tank Sending Unit Locking Ring — $3
Fuel Tank Strap Mounting Bolt Kit — $5
Stainless Steel Fuel Lines — $80
Fuel Line Clip Set — $14
GM Gas Cap — $19
Aluminum radiator closeout panel — $78
Horn Unit – low tone and high tone — $66
Fender to Radiator Support Bars – Chrome — $19
Big Block Fan Shroud Bracket — $8
GM Radiator to Support well nut (2) — $5
Hood stop bumpers — $6
Hood safety latch – chrome — $25
Fender to Wheel Well Bolt kit — $16
Shims 3/8″ slot, 50 — $10
Shims 1/2″ slot, 50 — $10
Halogen Headlamp Bulb — $26
Headlamp Retaining Ring — $22
Headlamp Buckets — $44
Brake Line Clips — $30
Fuel Line Clip Set — $34
Chrome License Plate Frames — $50
License Plate Nut Set — $5
Tail light housing bolts — $27
Side Marker Lamp Socket and Wiring — $17
Side Marker Lamp Gaskets — $5
Side Marker Lamp Nut — $5
Rear License Lamp Lens — $6
Brake Lamp Switch — $10
Side Marker Bulb — $7
Parking Lamp Bulb — $12
Tail Lamp Bulbs — $4 + $9 + $4
Rear Window Glass Molding Clip Kit — $15
Upper/Side Windshield Molding Clip Kit — $15
Lower Windshield Molding Clip Kit — $15
Glass Chrome Molding Removal Tool — $11
Additional wiring for electrical system — $18
Electrical Junction block — $7
TOTAL — $5110
[CLICK-> 1969 Chevy Camaro project car full story [FINAL] is here <-CLICK]
![1969 Chevy Camaro project car g-machine/resto-mod full story [PART-4]](https://www.camarocarplace.com/wp-content/uploads/2016/03/1969-Chevy-Camaro-project-car-g-machineresto-mod-full-story-PART-4.jpg)